
How to Recover Deleted Records in SQL Server 2019?
Do you want to retrieve deleted records of your SQL database table? You may have accidentally deleted the records while performing an UPDATE or DELETE operation against a SQL database without applying the WHERE clause. As a result, you may lose table data if you don’t have an updated backup. This post discusses methods on how to recover deleted records in SQL Server 2019.
Methods to Recover Deleted Records in SQL Server
Following are the two methods you can use to retrieve deleted table records:
Method 1 – Use Log Sequence Numbers (LSNs) and Transaction Logs
You can try to recover deleted rows and their records from a SQL Server database table if their time of deletion is known. For this, you need to use Log Sequence Number (LSNs). LSN is a unique identifier that is given to each record in a transaction log. Thus, LSNs can be used to regain access to the deleted records.
Note: For recovering deleted data, your database must have a FULL or BULK-LOGGED recovery model. You cannot perform recovery if the database is using a SIMPLE recovery model. If your db is set to the SIMPLE recovery model, then skip to the following method.
Using the LSNs and transaction log, you can try to recover deleted table rows. To understand how this approach works, let’s take an example. Here, we’ll be using a database named ‘Test_Database’ and an EMPLOYEE table containing deleted records. First, we will find the rows with deleted records from the EMPLOYEE table, take transaction log backup, and then find information about the deleted data. Finally, we will recover the deleted rows using the Log Sequence Number method. The detailed steps are listed below:
Step 1 – Find Rows in a Table with Deleted Records
Execute the following query to find the number of rows in a table from which records have been deleted:
|
SELECT * FROM Employee |
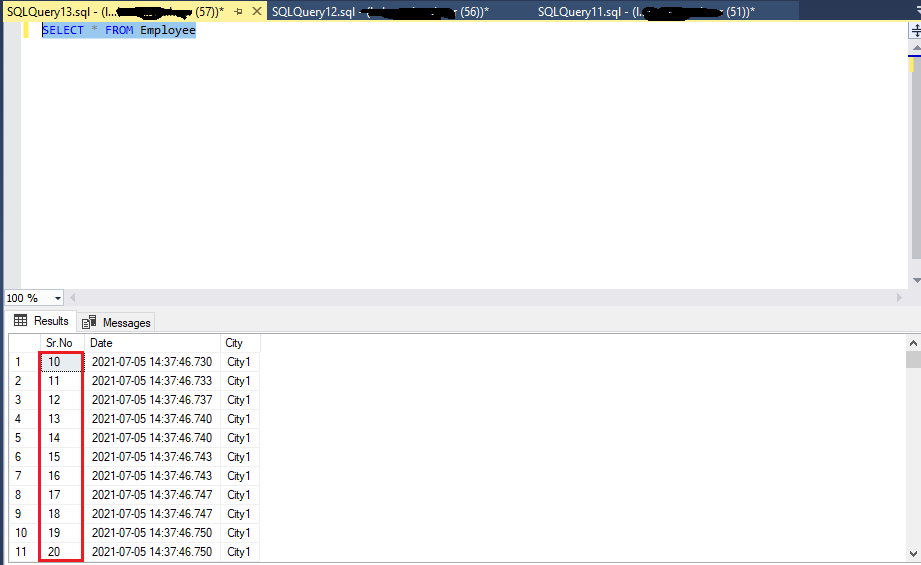
As you can see in the image above, rows 1 – 9 from the EMPLOYEE table are deleted.
Step 2 – Obtain Information about Deleted Rows
Run the query given below to find information about the deleted rows:
| USE Test_Database
GO Select [Current LSN], [Transaction ID], Operation, Context, AllocUnitName FROM fn_dblog(NULL, NULL) WHERE Operation = ‘LOP_DELETE_ROWS’ |
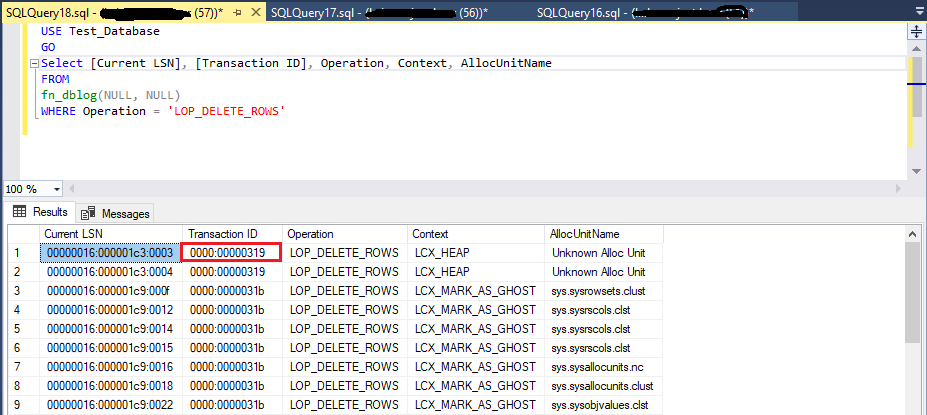
This is the output you’ll receive after executing the above query. Here, you can see the Transaction ID of the deleted rows (Let’s say 0000:00000319). You can determine the time when the rows were deleted using the Transaction ID.
Step 3 – Find Deleted Records using Transaction ID
Now, let’s use the Transaction ID (0000:00000319) to find the deleted records:
| USE Test_Database
GO Select [Current LSN], Operation, [Transaction ID], [Begin Time], [Transaction Name], [Transaction SID] FROM fn_dblog(NULL, NULL) WHERE [Transaction ID] = ‘0000:00000319’ AND [Operation] = ‘LOP_BEGIN_XACT’ |
Running this query will give you an output that looks similar to:
Here, you can see the current LSN (00000016:000001c3:0001) of the deleted record with Transaction ID ‘0000:00000319’.
Step 4 – Restore Deleted Records using LSN
We will be using the log sequence number ‘00000016:000001c3:0001’ to restore deleted rows in this step. Before we proceed, we need to convert the LSN value from hexadecimal to decimal form by adding “0x” before the current LSN value. For this, execute the below query:
| — Restore FULL database backup with NO RECOVERY
RESTORE DATABASE Test_Database_COPY FROM DISK = ‘C:\Program Files\Microsoft SQL Server\MSSQL10_50.STELLAR\MSSQL\Backup\Test_Database.bak’ WITH MOVE ‘Test_Database’ TO ‘C:\Program Files\Microsoft SQL Server\MSSQL10_50.STELLAR\MSSQL\Backup\Test_Database.mdf’, MOVE ‘Test_Database_log’ TO ‘C:\Program Files\Microsoft SQL Server\MSSQL10_50.STELLAR\MSSQL\Backup\Test_Database.ldf’, REPLACE, NORECOVERY; GO –Restore Log backup with STOPBEFOREMARK option to recover exact LSN. RESTORE LOG Test_Database_COPY FROM DISK = ‘C:\Program Files\Microsoft SQL Server\MSSQL10_50.STELLAR\MSSQL\Backup\Test_Database _tlogbackup.trn’ WITH STOPBEFOREMARK = ‘lsn:0x00000016:000001c3:0001’ |
The output of the above query is as follows:
As you can see in the messages window, the database has been restored successfully.
Step 5 – Check Deleted Records
Run the below query to check if the deleted rows have been restored:
| USE Test_Database_COPY
GO SELECT * FROM Employee |
The deleted rows will get added in the table Employee.
If this manual procedure fails to retrieve the deleted records, a third-party SQL recovery tool can come in handy.
Method 2 – Use SQL Recovery Tool
If the above method fails, try using Stellar Repair for MS SQL software to regain access to the deleted data. Unlike the time-consuming and erroneous manual procedure, using the SQL recovery tool can quickly recover deleted data from the database table in a few clicks. Also, the tool helps recover all the deleted records from the SQL database without any modification.
The tool provides an option to retrieve any deleted records from a SQL Server database without executing any complex queries. In addition, you can choose to recover all or specific records using third-party software.
Conclusion
While updating or deleting a table in the SQL database, you might have deleted records that you would like to restore. You can use the LSN method to regain access to the deleted records if the time of deletion is known. If this method doesn’t work for you, use a SQL recovery tool to get back your data.

